

It’s been some time that I exploit Microsoft To Do to organise my each day duties. From work-related duties to purchase groceries. Whereas Microsoft To Do is tremendous simple to make use of however there are some challenges in utilizing it extra effectively, particularly when you might have a number of O365 accounts inside totally different organisations. Listed below are among the challenges I confronted; it’s possible you’ll face different challenges too:
- The Microsoft To Do app for Home windows gadgets may be very person pleasant with amazingly good options like the power so as to add a number of To Do accounts. Nonetheless, we at the moment have to pick out which account we want to use and the app exhibits all our duties inside that particular account. This implies we cannot see all our duties from all our accounts in a single place.
- The Microsoft To Do app for iOS gadgets can also be very useful to make use of, however it lacks including a number of accounts. Therefore we can’t see all our duties from a number of O365 accounts on the app. 🙁
- We are able to use the Duties inside the Microsoft Outlook desktop utility (I used the Home windows model) which is by far probably the most complete one with tons of options. Whereas we will see duties from a number of accounts in a single place, it’s a actual problem if I wish to know which activity is assigned to which account. Apart from, it’s actually onerous to reply some questions like, what number of high-priority duties I’ve for right this moment or the week forward. I do know, we will group duties, however, it’s nonetheless not so intuitive.
For the above causes, I looked for a product that may do all of the above directly. After spending some hours, I believed, nicely, I’ve to do it myself.
With that, let’s go forward and see how we will get the job executed in Energy BI.
Observe:
This methodology is just not working for Microsoft To Do utilizing private accounts reminiscent of Outlook, Hotmail or MSN. If anybody is aware of methods to add these, please tell us within the feedback part under this publish.
It is a lengthy publish that took me an inexpensive period of time to jot down. So I added the next desk of contents so you may rapidly soar to a topic of your curiosity.
Desk of Contents
How It Works
Microsoft Energy BI is NOT a reporting instrument solely. We are able to connect with many information sources, combine and match the information, create information fashions and visualise the information. So it ought to be potential to hook up with a number of To Do accounts, append the information, create a easy information mannequin on high of that, and visualise the information to reply our questions or our clients’ questions. The Microsoft To Do information is accessible through the Microsoft Alternate On-line connector obtainable in Energy BI. The remainder is dependent upon our necessities and what questions we want to reply.
In my case, by which I’m the end-user of the report, I would love to have the ability to know:
- Right now’s duties: All duties that their StartDate or DueDate is right this moment or the Duties with none StartDate and DueDate
- Variety of duties
- Variety of essential duties
- Duties by mailbox
- Duties particulars
- Activity record
- Activity description
- Standing
- Begin date
- Due date
- A hyperlink to the duty itself that I can replace if I wish to
- All Duties
- All above plus
- Variety of open duties
- Variety of accomplished duties
- All above plus
You or your buyer(s) may need totally different necessities, however when you perceive methods to get the To Do information from Microsoft Alternate On-line and do some information explorations to seek out out what you might be after, you’ll be good.
Integrating A number of To Do Accounts in Energy BI
Earlier than we begin, I prefer to encourage you to alter your Energy BI settings to permit parameterisation in all connection and transformation dialogue containers. The next steps clarify how to take action:
- In Energy BI Desktop click on the File menu
- Click on Choices and settings
- Click on Choices
- Within the Choices, window choose the Energy Question Editor tab
- Tick the All the time permit parameterization in information supply and transformation dialogs choice
- Click on OK

With that, allow us to get the Microsoft To Do information in Energy BI Desktop.
Getting Information from the Supply
This part explains methods to get the information from Microsoft Alternate On-line for Microsoft To Do.
Comply with these steps:
- Click on Get information in Energy BI Desktop
- Seek for Microsoft Alternate
- Choose Microsoft Alternate On-line (you need to use Microsoft Alternate as nicely, in our state of affairs each connections work the identical)
- Click on Join

- Click on the Parameterise drop down button and choose the New parameter… choice to open the Magane Parameters window. This button is enabled as we beforehand enabled this characteristic.

- Kind in a Title for the parameter
- Change the Kind to Textual content
- Kind in your e mail deal with related along with your account within the Present Worth
- Click on New and repeat the method from step 6 for creating a question parameter for all To Do accounts you’d prefer to combine
- Click on OK

- Choose the specified question parameter within the Mailbox deal with dropdown from the Microsoft Alternate connector
- Click on OK

We’ve just a few choices on the Navigator window. We are able to analyse our Calendar, Electronic mail, and many others., however this weblog publish goals to get the information from Microsoft To Do. I go away that so that you can discover extra on these areas :).
- Tick the Duties desk. That is the desk that retains all To Do information 😀
- Click on Rework Information

We at the moment are navigated to the Energy Question Editor with 3 queries showing on the Queries pane; the 2 question parameters we created earlier and the Activity desk loaded from Microsoft Alternate On-line. Now we have now to repeat the method and get the information from our different accounts. After getting information from all our accounts, we have now to organize the information to satisfy our necessities.
Observe:
I renamed the queries to Activity 1 and Activity 2.

Up to now, we related to a number of Microsoft Alternate On-line sources. That’s the very first step. The following step is to organize the information to satisfy our necessities.
Information Preparation
I’ve to say that the information is nicely structured already; due to this fact, we have now to spend much less effort to organize the information. The following couple of steps handle my necessities which may be totally different than yours:
- Proper-click every question
- Disable information load (I want I may choose a number of queries and disable load for all chosen queries. In the event you assume this can be a good concept that improves the event please vote for this concept which was posted a very long time in the past.)

I disabled the information load as I require to Append the queries. I want to append the queries right into a separate question, so it might be simpler to make adjustments sooner or later if I require to alter something within the unique queries. I’ll revisit this level later on this publish.
- Choose a question from the Queries pane
- Click on the Append Queries dropdown button
- From the Residence tab, choose the Append Queries as New choice

- Choose the primary and second queries you’d prefer to append. In case you are appending greater than two tables click on the Three or extra tables radio button
- Click on OK

- At this level it’s possible you’ll get the Info is required about information privateness warning. We’re getting this warning as we’re appending the information from two information sources which might doubtlessly result in information leakage as the information can trasit from a knowledge supply to a different. In our state of affairs this isn’t a priority as we’re the proprietor of each information sources. Click on the Proceed button

- Set the privateness degree for all appending information sources
- Click on Save

Essential word:
I set the Privateness Stage to Organisational as I’m not coping with delicate information on this specific instance. Make sure you utterly perceive the totally different choices obtainable for configuring the Privateness Stage to forestall any potential information leakage. Learn extra about Privateness Ranges right here.
- Choose the Append1 question from the Queries pane and rename it to Duties. You’ll be able to rename a question by double clicking the question from the Queries pane.

Now that we appended the queries, it’s good to take a look at the outcomes to see how lots of the necessities we will meet with the information in its present form.
I can see within the information that I’ve a Folder Path column. This column exhibits me the totally different activity lists I created in Microsoft To Do. The next picture exhibits the information in Energy Question Editor side-by-side the Microsoft To Do duties from certainly one of my accounts.

Revisiting the Necessities
Trying nearer to the information exhibits that the Topic column comprises my duties; I’ve StartDate and DueDate columns in addition to Standing and Significance columns. my necessities, I can use all of these columns to assist my necessities colored in inexperienced:
- Right now’s duties
- Variety of duties
- Variety of essential duties
- Duties by mailbox
- Duties particulars
- Activity record
- Activity description
- Standing
- Begin date
- Due date
- A hyperlink to the duty itself that I can replace if I wish to
- All Duties
- All above plus
- Variety of open duties
- Variety of accomplished duties
- All above plus
As you may see, we will already meet many necessities, however what concerning the necessities colored in purple? If we take a look at the information, we see no technique to distinguish between duties coming from a number of accounts. This is a matter that we have now to resolve. One fast repair is so as to add a brand new Customized Column into each Activity 1 and Activity 2 queries utilizing the values of the 2 question parameters. Bear in mind, the question parameters comprise our e mail accounts. As acknowledged earlier, we disabled information load and appended the Activity 1 and Activity 2 queries as a brand new question. The Duties question should embrace the brand new customized column.
- Click on the Duties 1 question from the Queries pane
- Click on the Customized Column button from the Add Column tab
- Give the brand new column a reputation
- Kind the corresponding question parameter title used for connecting to Microsoft Alternate On-line
- Click on OK

If we scroll to the very finish (to the best), we see our e mail deal with is added as a brand new column.
Now repeat the above steps (1 to five) for the Duties 2 question.
- Click on the Duties question from the Queries pane
- On the information view, scroll proper to the very finish to see the brand new Supply column presents

With that, we at the moment are cable of figuring out duties by the mailbox.
So the one remaining requirement that the present information doesn’t assist is a hyperlink to the duty to switch the duty if wanted. This one is a bit tough as the information doesn’t counsel such a hyperlink on the first look. Let’s look extra completely on the Duties information. There are 5 columns containing structured values inside the Duties desk. We are able to click on on every cell of information to see the underlying information.

Observe:
If we click on on the structured worth itself, Energy Question drills all the way down to the underlying information. We have to click on the cell, not the worth.
Manually exploring all structured columns to discover a particular worth generally is a time-consuming course of. We are able to use some strategies to undergo the structured values, however these are out of the scope of this publish. Possibly I write a separate weblog publish about that later. However the excellent news is that I do know which column comprises the URL to the Activity. It’s the Attributes column. Comply with these steps to develop the Attributes column and the URL:
- Click on the Develop button on the best facet of the Attributes column
- Untick the Choose All Columns
- Untick the Use unique column title as prefix choice
- Scroll down and tick the WebClientReadFormQueryString
- Click on OK
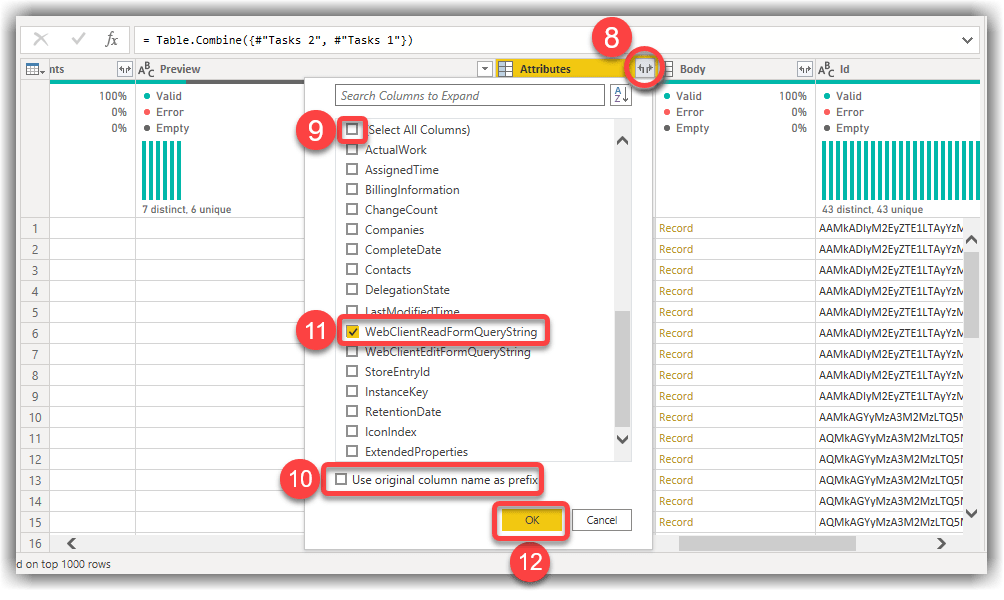
- Double click on the WebClientReadFormQueryString column and rename it to Net URL
- Click on the Shut & Apply button from the Residence tab

Up to now, we ready the information to assist all our necessities. Once we click on the Shut & Apply button on Energy Question Editor, it hundreds the information for all queries by which their Allow Load is energetic. We disabled information load for Duties 1 and Duties 2 tables. Due to this fact solely the information of the Duties desk is loaded into the information mannequin.
Information Modelling
Within the earlier part of this weblog publish, we ready the information based mostly on our necessities. The information is now loaded into the information mannequin. If we take a look at the necessities once more, we see some factors that we have now to handle. Our necessities have two predominant elements to analyse the information for Right now’s Duties and All Duties. To analyse Right now’s Duties, we require to determine if the DueDate falls into right this moment’s date. To have the ability to deal with date-related calculations, we require to create a Date desk. Learn extra concerning the Date desk right here.
Creating Date Desk
We are able to create the Date desk both in Energy Question Editor or within the information mannequin utilizing DAX. In my pattern, I create the Date desk utilizing DAX. Different bloggers over the web already wrote DAX expressions to create a Date desk. Some are quite simple, and a few are very complicated. I exploit an easy model utilizing the CALENDARAUTO() operate.
- Click on the New desk button from the Modelling tab
- Copy/paste the next DAX expression and press Enter
Date =
    ADDCOLUMNS(
        CALENDARAUTO()
        , "Yr", YEAR([Date])
        , "Month", FORMAT([Date], "MMMM")
        , "MonthOrder", FORMAT([Date], "MM")
        , "Day", DAY([Date])
        , "IsToday", [Date] = TODAY()
        )
Marking Date Desk as Date
Up to now, we created a Date desk. Now we have now to mark it as Date. Learn extra right here to know what marking a Date desk as Date means and why we must always do this. Comply with these steps to take action:
- Proper click on the Date desk
- Hover over Mark as date desk and click on the Mark as date desk from the context menu
- Choose the Date as Date column. Be certain the validation was profitable
- Click on OK

Creating Relationships
Now that we efficiently created the Date desk and marked it as Date, we should create the connection between the Duties and the Date desk. Be taught extra concerning the idea behind the relationships right here. We’ve just a few choices relating to create and handle relationships:
- We are able to use the Handle Relationships button obtainable on the Report view, Information view and Mannequin view (proven within the following picture)
- Or we will drag-and-drop key columns from a desk to a different

The next steps present methods to create the connection from the Mannequin view utilizing the drag-and-drop choice:
- Click on the Mannequin view
- Drag the Date column from the Date desk and drop it on the StartDate column from the Duties desk. This creates an Energetic Relationship confirmed with a strong line between the Date and Duties tables
- Drag the Date column from the Date desk, however this time, drop it on the DueDate column from the Duties desk. This creates an Inactive Relationship between the 2 tables

Learn extra about Energetic vs. Inactive relationships right here.
By creating the relationships, we will now assist all our necessities. Our date desk has an IsToday column that flags if a selected date is certainly right this moment’s date. We are able to use this column later to reply the questions round Right now’s Duties. With that, it’s time to create some measures.
Creating Measures
One of the widespread and undoubtedly an important duties whereas creating a Energy BI information mannequin is creating measures. With measures, we will do calculations reminiscent of summations, averages, counts, and many others. There are two sorts of measures:
- Implicit measures: Implicit measures or automated measures proven with a Sigma icon (
 ) within the Fields pane in Energy BI Desktop. These are the measures which might be routinely created when utilized in a visible on the reporting canvas. In different phrases, we do not create implicit measures.
 - Specific measures: Specific measures however are these ones we create inside the information mannequin utilizing DAX. The express measures additionally present up within the Fields pane in Energy BI Desktop. The icon for specific measures is a calculator (
 ).
).
Learn extra about measures right here.
It’s best follow all the time to create specific measures. After I point out making a measure, I confer with specific measures. We should all the time create the measures to assist our necessities, so in our pattern, we’ll create the next measures:
- Measures to calculate for all duties
- Variety of duties
- Variety of essential duties
- Variety of open duties
- Variety of accomplished duties
- Measures to calculate for right this moment’s duties:
- Variety of duties
- Variety of essential duties
Right here is how we create a measure in Energy BI Desktop:
- From the Report view or the Information view, right-click the Duties desk
- Click on the New measure
- Kind within the following DAX expression
- Press Enter from the keyboard or click on the Submit button to create the Variety of Duties measure
Variety of Duties = COUNTROWS(Duties)
Repeat the above course of for the opposite measures utilizing the DAX expressions under.
Measures for All Duties
Essential Duties =
    CALCULATE([Number of Tasks]
        , Duties[Importance] = "Excessive"
    )
Open Duties =
CALCULATE([Number of Tasks]
, NOT(Duties[IsComplete])
)Accomplished Duties =
CALCULATE([Number of Tasks]
, Duties[IsComplete]
)Measures for Right now’s Duties
Per our necessities for calculating Right now’s Duties, we have now to seek out all duties that their StartDate or DueDate is right this moment or the Duties with no StartDate and DueDate. This particular a part of the requirement comprises three situations:
- Duties beginning right this moment
- Duties due right this moment
- Duties with out StartDate and DueDate
So we will break the calculation into three separate measures. We then create a fourth measure so as to add up the outcomes of these three measures as under:
Duties Beginning Right now =
    CALCULATE([Open Tasks]
        , 'Date'[IsToday]
        )
Duties Due Right now =
CALCULATE([Open Tasks]
, 'Date'[IsToday]
, USERELATIONSHIP('Date'[Date], Duties[DueDate])
)Duties with No Begin or Due Date =
CALCULATE([Open Tasks]
, AND(ISBLANK(Duties[StartDate]), ISBLANK(Duties[DueDate]))
)Right now's Duties = [Tasks Starting Today] + [Tasks Due Today] + [Tasks with No Start or Due Date]The final measure to create is Right now’s Essential Duties. The next DAX expression caters that:
Right now's Essential Duties =
    CALCULATE([Today's Tasks]
      , Duties[Importance] = "Excessive"
    )
Now that we created all of the required measures, it’s time to visualise the information.
Information Visualisation
Up to now, we ready the information and constructed our information mannequin. It’s time now to carry our information to life and constructed some significant information visualisation. Once more, the overall rule of thumb is to take a look at our necessities first then begin visualising the information. In your comfort, I copy the necessities right here to keep away from transferring up and down on this weblog publish.
- Right now’s duties: All duties that their StartDate or DueDate is right this moment or the Duties with none StartDate and DueDate
- Variety of duties
- Variety of essential duties
- Duties by mailbox
- Duties particulars
- Activity record
- Activity description
- Standing
- Begin date
- Due date
- A hyperlink to the duty itself that I can replace if I wish to
- All Duties
- All above plus
- Variety of open duties
- Variety of accomplished duties
- All above plus
One of many greatest challenges in information visualisation, whatever the visualisation instrument we use, is actual property. It’s fairly difficult to make use of the obtainable house on the report canvas to symbolize the knowledge effectively. It isn’t price constructing a flashy and vibrant report that doesn’t inform a narrative concerning the information and doesn’t reply the enterprise questions mirrored within the necessities. Information visualisation is a significant subject that requires particular consideration to element. There are a lot of greatest practices round information visualisation which might be out of the scope of this weblog publish. So, I put collectively a easy information visualisation that meets all the necessities.


Within the subsequent few sections, I rapidly clarify some easy strategies used within the above visualisation, leaving the remainder so that you can examine.
Exhibiting URL Hyperlinks in Desk Visible
Exhibiting a URL hyperlink as a substitute of exhibiting a textual full hyperlink may be very simple. Comply with these steps to get it executed:
- Choose the Net URL column from the Duties desk
- Choose the Net URL choice from the Information class dropdown from the Column instruments tab
- Click on the Desk visible
- Click on the Format tab from the Visualisations pane
- Seek for url
- Toggle on the URL icon choice

Filtering the Information to Present Right now’s Duties Solely
As you may see within the Right now’s Duties report web page, we have now a Desk visible containing the required columns from the Duties desk exhibiting all duties. We require to filter the information proven on the desk solely to indicate right this moment’s duties. It’s possible you’ll assume that we will use the IsToday column from the Date desk on the visible filters. Suppose we filter the Desk visible utilizing the IsToday column when IsToday equals True. In that case, we’re placing a filter on the Date desk. The filter propagates to the Duties desk through the connection between the Date column from the Date desk and the StartDate column from the Duties desk. Due to this fact, the values on the Desk visible are filtered solely when the beginning date is right this moment. However this isn’t what we require. The necessities clearly say, “Right now’s duties are all duties that their StartDate or DueDate is right this moment or the Duties with none StartDate and DueDate”. So we can’t merely filter the values of the Desk visible by the IsToday column from the Date desk. The answer is easy. We already carried out the required logic within the Right now's Duties measure. We are able to put this measure on the Desk visible, which ends up in exhibiting the proper values.

Whereas it might look to be answer, it isn’t very best. In actuality, we’re not including any insights by including the Right now's Duties measure to the Desk visible, because it exhibits 1 in nearly all rows. Including a measure to a visible to solely clear up our downside with out including any worth is inappropriate. A greater answer is to filter the Desk visible by the Right now's Duties measure. Comply with these steps to see how:
- On the Right now’s Duties web page, click on the Desk visible
- Proper click on the
Right now's Dutiesmeasure from the Fields pane - Hover over Add to filters and click on Visible-level filters

- On the Filters pane, choose the is just not clean choice from the Present objects when the worth dropdown record
- Click on Apply filter

It’s executed now.
Downloading the Pattern File
You’ll be able to obtain the PBIT model of the report from right here.
As all the time, please let me know you probably have any feedback or suggestions through the feedback part under.
Associated
Uncover extra from BI Perception
Subscribe to get the newest posts despatched to your e mail.